
DCP Creation Basics
Get a introduction and quick start to cinema mastering and DCP creation right from your Timeline. Let me give you an overview, because you might be tempted to find the cheapest route for your DCP, but don’t risk issues that could derail your screening.
If you want to dive deeper into the process and get step-by-step guides, consider my English & German products:

Digital Cinema Crashcourse
What is a DCP if not a media file?
⬅︎ This is a Digital Cinema Package. As the name suggests, it is not a simple one media file anymore but instead a collection of equally important parts—and they all have to play together and fulfill certain requirements.
That means if you start from a finished movie file (no matter its format) or an edit (meaning: open timeline/project), the DCP creation process starts with separating video and audio, extracting contents and building new files.
In the resulting MXF for the picture, you'll end up with hundreds, thousands and hundreds of thousands of images. One for each frame of your video—that way, the codec and its specifications become irrelevant. In similar fashion, in the resulting MXF for audio, you'll end up with a PCM WAV for each audio channel.
As for the metadata XML files, those are the actual skeleton holding a DCP together, defining its specs and format. It is a code map, telling a cinema system if all assets are healthy and correct, which one to use where and how, what each one is and does, and how to sync all of them up.
You cannot play back a DCP without a special environment, hard- and software outside a cinema. This makes testing difficult—you better know what you are doing. You will also read below that DCP tech is quite old, and this brings some restrictions.
What does screening a DCP involve?
DCP, as the industry's official digital standard, is the highest quality consumer format we have available. Its mastering (not its creation) is quite complex, with lots of variables influencing the outcome in both quality and compatibility. You should not create it from a ultra-lossy MP4 H264 file, which only has 25% of the original data left.
The mind-blowing part is that DCP was defined in 2002 (a time deeply defined by DVDs and very blotchy web videos) and by its release in 2005 could already handle up to 4K with a bigger color space and color depth than anything we had electronically available back then, besides, of course, analogue 35mm film and cinema.
But being an old system, there are limitations, one of which is that (officially certified) cinema equipment is a closed box, completely built on Linux software. That was the only way to process such high data masses digitally in real time in the early 2000s. Hence, legacy cinema servers (the brains of DCP) cannot read modern file systems like exFAT, or APFS. Also, most of these servers only support very slow USB 2.0 – Typical size of a DCP: 1 min ≈ 1 GB

The three basic pillars of DCP
①
Two distinct formats with a varying feature set: Legacy but safe versus new but experimental.
IOP or SMPTE? When exporting DCPs you have to choose one of the these standards (which is very important and can send you down a rabbit hole):
Only strict interOP (IOP) offers guaranteed global compatibility but requires use of 24p
If you explicitly want to use SMPTE, e.g. to enable 25p, you need to know that all targeted cinemas support it and care for adding the extended metadata manually (which Resolve does not offer as of v21).
②
There are officially defined specifications for all parameters, and you should follow them.
DCPs are 2K-flat 1998x1080, ratio 1.85:1 or 2K-scope 2048x858, ratio 2.39:1 (regular)
While technically compatible, 16:9 content (like full HD, 1920x1080) is usually resized and cropped to 2K but can also be padded with black bars on the sides. On curved cinema screens, those may look distorted.
Stereo is not recommended. If you don’t have surround sound, you can provide 3.0 (dialogue on a separate track). Keep the max. loudness at -4 dB.
③
Make sure to only use the highest quality files possible and record in a good codec to begin with.
Use the industry standard for DCP input: ProRes 422 HQ or 4444 as .MOV or .MXF
Render it in maximum depth/quality if coming from Adobe, using the original resolution and frame rate.
If you can, tag your export as rec.709 gamma 2.4 in legal range (video levels). Avid/Adobe often use 2.2
To fit the selected DCP format, all specs, incl. crop and FPS, will be adjusted during DCP creation if needed.


A distinct difference in image parameters
Digital cinema uses a different color space than what any of your normal devices show: It's called DCI P3 and also uses a different gamma (contrast distribution) of 2.6 compared to digital video with 2.4 (rec709) or standard computer displays with 2.2 (sRGB)—as well as a different whitepoint of D63 compared to D65 for normal rec.709 media. That means there is a lot of transformation going on when converting from RGB to XYZ (cinema)—aka computing power. You need to use the right input values for this transformation to go correctly; otherwise, shifts in contrast occur.
This is a mathematical process, and you might see completely off colors during processing, the goal, however, is having the DCP match your input. You can simulate this (not fully accurate) with dedicated DCP player software, which transforms all values back in real time. Furthermore, DCPs use 12-bit color depth in 4:4:4 subsampling (meaning no color compression at all). If you are coming from highly compressed sources (e.g., 8 bits in 4:2:0), the cinema experience will suffer.
Do I need a new computer?
The best machines to work with and render DCPs are MacBook Pros/Airs with M1 or better (pro series recommended, avoid the smallest 256 GB storage option). These models offer the necessary computational power for smooth export and playback while having sofware like Davinci Resolve especially well optimized for them. All MacBooks also offer a DCI P3 display (use the right preset), and macOS itself has accurate color management built-in.
It is, however, absolutely possible to work with older Intel models or PCs, it is just slower and less accurate. Davinci Resolve takes a lot more hardware requirements than DCP-o-matic. Also: Free up enough storage.
Which software is recommended?

Davinci Resolve Studio (Paid)
You can either bring in your final export from any other editing app, or you have assembled your project in Resolve from the start—either way, if you have the paid Studio version, you also have a great way to create DCPs. This does need some adjustments and crucial changes in workflow, it is also not perfect. You can also re-import and read DCPs like any other media file for playback and soft-checking it.
Advantages:
- faster (on modern machines)
- complete mastering options
- smaller DCPs (better codec)
- full color & gamma control
- full image size/crop control
- audio mixer/normalizer
- no need to leave the app or create another export
Disadvantages:
- more complex setup
- no DCP soft subtitles
- SMPTE synax incomplete
- no re-editing of DCPs
- no transfer to Linux disks
🢃

DCP-o-matic Suite (Free)
You can bring in your final export from any other editing app, open other DCPs and manipulate their content (e.g. fix syntax or exchange audio, add subtitles) or combine different assets. This powerful suite has been around for a long time and got a lot of user input. It also offers encryption, as well as validation and linux cloning via extra apps. Due to using open-source code, it is significantly slower and less accurate.
Advantages:
- easier setup (also linux)
- solid IOP & SMPTE syntax
- can re-edit DCPs
- supports soft subtitles (SRT)
- extra Player with QC validation
- extra Writer for Linux disks
- auto stereo to surround upmix
- works on older systems too
Disadvantages:
- slower
- limited mastering options
- limited color/gamma control
- limited scaling/crop control
- bigger DCPs
Being beginner-orientated, DCP-o-matic features a very good online guide of its own, which suffices for now.
DCP creation in Davinci Resolve Studio
Beginner Tutorial only | Versions 20–21
The easiest and best starting point is to export your movie in ProRes (as described above) from your current software, set up a blank DCI project in Resolve, and import it as a new asset to start fresh with a new timeline as well. Before you do that, get the project settings right, this is one of the crucial parts of the process, as important image transformation parameters are set here.
If you edited your clip/film in Resolve, you should consider exporting as ProRes first as well, especially if you mixed different color spaces or color transformations, as an export with the below-mentioned project settings would bring everything to the same level and avoid visual shifts for some clips in your timeline if they are not correctly matching others.
Also, the more important reason is that you can only perform a frame rate conform (e.g. 25p→24p or 23.98p→24p) for both audio and video on a self-contained movie file (see steps below too).
Important note: these operations have been done ever since the invention of analogue TV and can only happen without visual degradation via speed change, which is most notable between 25p<>24p, where a value of 4% is applied for both audio and video, making the film longer/shorter. In the case of 23.98→24p (mandatory), however, it is only 0.1% and not noticeable at all.
Create new project, copy the following settings:
①

As described, DCP only knows two standard resolutions and ratios. You can easily find those by choosing one of the 2K DCI settings that fit your source best (you might not have edited in a DCI resolution, but you could have). While you can and should use a 4K source (if you have it) to be scaled down, you do not need to make 4K DCPs since only some cinemas support that, and the difference in quality is small, file sizes, however, are doubled. If your original is HD or UHD in 16:9 (1920x1080), you should choose DCI flat, which is a little wider (1998x1080).
And, of course, for safe IOP, set the project frame rate to 24p here (conforming will be discussed later), unless you explicitly want/need something else like 25p (still considered experimental) which only works with SMPTE.
②

Avoid black bars (padding) if you can, these are neither black in cinemas (projector too strong) nor often have straight lines (curved screens). To automatically fit your imported ProRes inside the DCI frame, choose this scaling option, which will crop the necessary pixels and fill the frame. This works great for HD→flat but not for HD→scope (you should film and edit in scope for that).
Rest assured, Resolve's resizing is one of the best in business, just keep the algorithm set to sharper at the top. Note: This is not using any AI upscaling. The results will look very natural and homogenous for HD→2K (but might not for HD→4K).
③

Now comes the most important and probably most overlooked step. This does not only apply to DCP but to any other industry format export, like broadcast or VOD, that is not in HDR/HLG. These settings used to be the default ones in Resolve before version 20 are safe and consistent, as they fix video files that are missing this metadata tags or use the wrong ones. Change it to the digital video standard of rec709 gamma 2.4 in manual mode.
Why? Because you need a calibrated system (accurate monitor and software) for accurate export and interpretation, which people rarely have. This is important for the interpretation of your source, since this is, as already mentioned, the digital video standard, and ProRes uses it baked-in too. So, for any mastering, but especially DCP, this should be your base value for the transformation to DCI P3 with gamma 2.6—otherwise, contrast will be off in cinemas.
Important note: From here, Resolve will handle the transformation to XYZ color space and gamma automatically when you choose DCP as an export format, but it needs these input/entry values for the math to work.
If, for some reason, you are absolutely sure your source used gamma 2.2 instead (Adobe/Avid on Windows due to missing color management and sRGB default there), set it to rec.709 g2.2 of course.
④

On macOS, you get a system-wide color management, but you might want to check out Resolve's preferences (not project settings) to find ways to make your pipeline more independent and accurate by taking any display profiles out of the equation. Resolve 20 adapted to the new and changed for the better color sync, which Apple introduced with macOS 26.
rec.709-A has been made obsolete on Apple Silicon (M-series) machines with the new XDR screens defaulting to BT.709 g2.4 for video now instead (if you switch off profiles).
Media Tab – add your movie to the project:
- Put your imported movie into the project and ignore the complaint about a frame rate mismatch (if you are not using 24p to begin with).
- Create a new timeline out of the movie to apply the project settings to it.
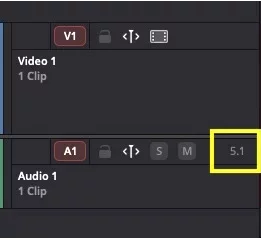
- Make sure to use 5.1 for the audio track configuration, even if you are only stereo (to avoid any potential issues with missing channels in the DCP).
You have successfully taken care of the basic image parameters, frame rate and audio layout. Your movie should now be scaled and/or cropped to fill the frame, use a 24p timebase (no actual conforming applied yet), and put stereo into a surround layout (or remain 5.1 if you started with it).
–Skip the next row if your source already is 24p (but not if it's 23.98p).
Edit Tab – frame rate conform to 24p:
⑤

Firstly, 24p is mandatory for the safe interOP standard but can also be used for the newer SMPTE one. The latter also supports 25p or 30p but does not work everywhere. Ignore this row if you want to use one of these (and have your project set to it).
Important note: SMPTE does not support 23.98p or 29.97p
⑥

Right-click your movie in the timeline to access speed controls for both audio and video together.
Change the speed to 96.0% if you are coming from 25p and to 100.1% if your source is 23.98p. Duration and pitch will be adjusted automatically, but not the clip length, hence:
⑦

Because Resolve does not adapt it for you, prolong clip length to the new duration. E.g., 1-hour 25p clip ➝ 2.4 seconds longer
Important note: You will need to adjust timings for subtitles if you are planning to include some via SRT in the DCP, because you have a new timebase now.

Pro Tip – Secret Sauce
You can make your life a lot easier by using Final Cut Pro for preparing your master. Not only does it support lossless smart rendering (within ProRes), but it also makes frame rate conform as simple as just dragging a video to a project set to 24p. Everything happens automatically (incl. audio pitch correction), and for the export only metadata (timebase) is changed without the need for re-rendering.
You can also use its space designer (surround panner) to easily upmix stereo to 5.1 with all channels playing and dialogue party separated from music or background automatically. You can choose basic surround or create space as starting points for frequency distribution.
Delivery Tab – it's time to start that export:
⑧

⑨
(8) Make sure to use the same specs as in project settings and activate interOP packaging (if eligible; otherwise, it will automatically be SMPTE). DCP bandwidth has a general max limit of 250 mbit/s, and that is reserved for 4K, so it is plenty enough to use 150 mbit/s for 2K, where 1 minute is around 1 GB for easy storage calculations.
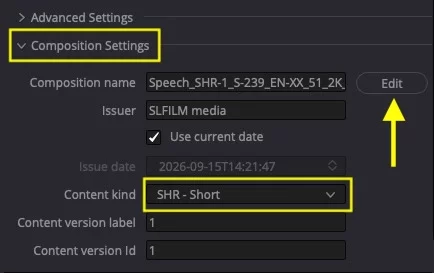
(9) Scroll further down to find and open composition settings, where you define the type for your DCP, which is equally important as clicking edit to access the title tool as seen below.
①⓪

One of the most important steps is this (well hidden) one. If you do not fill out this information, the DCP might not play in a cinema or be rejected during QC. The composition title tool incorporates all important specs and details about what you are going to deliver. Adjust the settings you see above.
On a cinema server, this is all you get to see—and there are hundreds of DCPs on there. In order for the operator to find your content, especially the title and type (previously set) must be clear and correct. And, of course, if you deliver several language versions, the corresponding info has to be there.
①①

①②

(11) Change the view to audio and make sure you are using the timeline track in 5.1, not any bus. If you like (or are unsure of the loudness/sound mix) you can additionally activate the audio normalizer set to the BS.1770-4 cinema setting, which, when used with safe -4 dbTP, corresponds to the cryptic 82 leq(m) standard often mentioned by agencies for ads or trailers.
(12) Changing the view to file lets you use your previously set-up DCP title tag in the title tool as the name for the exported folder (not file), which is the usual practice and handy.
Congrats, you are done – the last step is QC & transfer:
①③
You will find a folder in your target directory that contains your DCP. Yes, all of the assets inside are needed, so ZIP it to keep it safe (trust me, that's important). You can now either drop that ZIP in a cloud sync folder for delivery (dropbox, gdrive,...) or use the source folder with wetransfer, swisstransfer or other services that use p2p bit cloning directly. Or you use one of the ways described below in (3) to transfer the DCP to a compatible (Linux) hard drive.
Either way, you should always verify (test) your DCP before delivery (upload) and after every copy/clone you might do to an external hard drive. DCPs break easily, and your recipient should (or does it anyway) verify them as well, because a download can fail and corrupt the DCP, and so can a bad USB transfer to a drive (or a copy to a different file system at least).

How to do that? The easiest way is in the already mentioned free DCP-o-matic Player, which features a verification tool as shown above. You can have it create a validation report for you, as seen at the very bottom of this page. It can also analyze your audio via the entry beneath, where you would see if your audio might be too loud (amongst other things).
Of course, there are other QC tools as well, but this is a very good and simple one. Before you go, it's worth checking out the overview below, as you might run into one of these issues:
Appendix:
Why doesn't my selfmade DCP work?
In my experience, around 50% of first-time-made DCPs either get rejected by festivals or agencies if they run QC validation or remain unchecked and do not ingest/play in cinemas at all.
The three most common reasons for this are:
①
Your content's specs are not compatible or conflict with the chosen DCP standard (IOP vs. SMPTE).
The older/original InterOp (IOP) standard is guaranteed to play in virtually any cinema around the world, but only uses 24p/48p, while the newer SMPTE standard supports many more frame rates and handles subtitles more robustly.
While it might be tempting to go with the seemingly better SMPTE, the default choice should be InterOp for maximum compatibility. SMPTE needs additional metadata input, it otherwise fails QC validation.
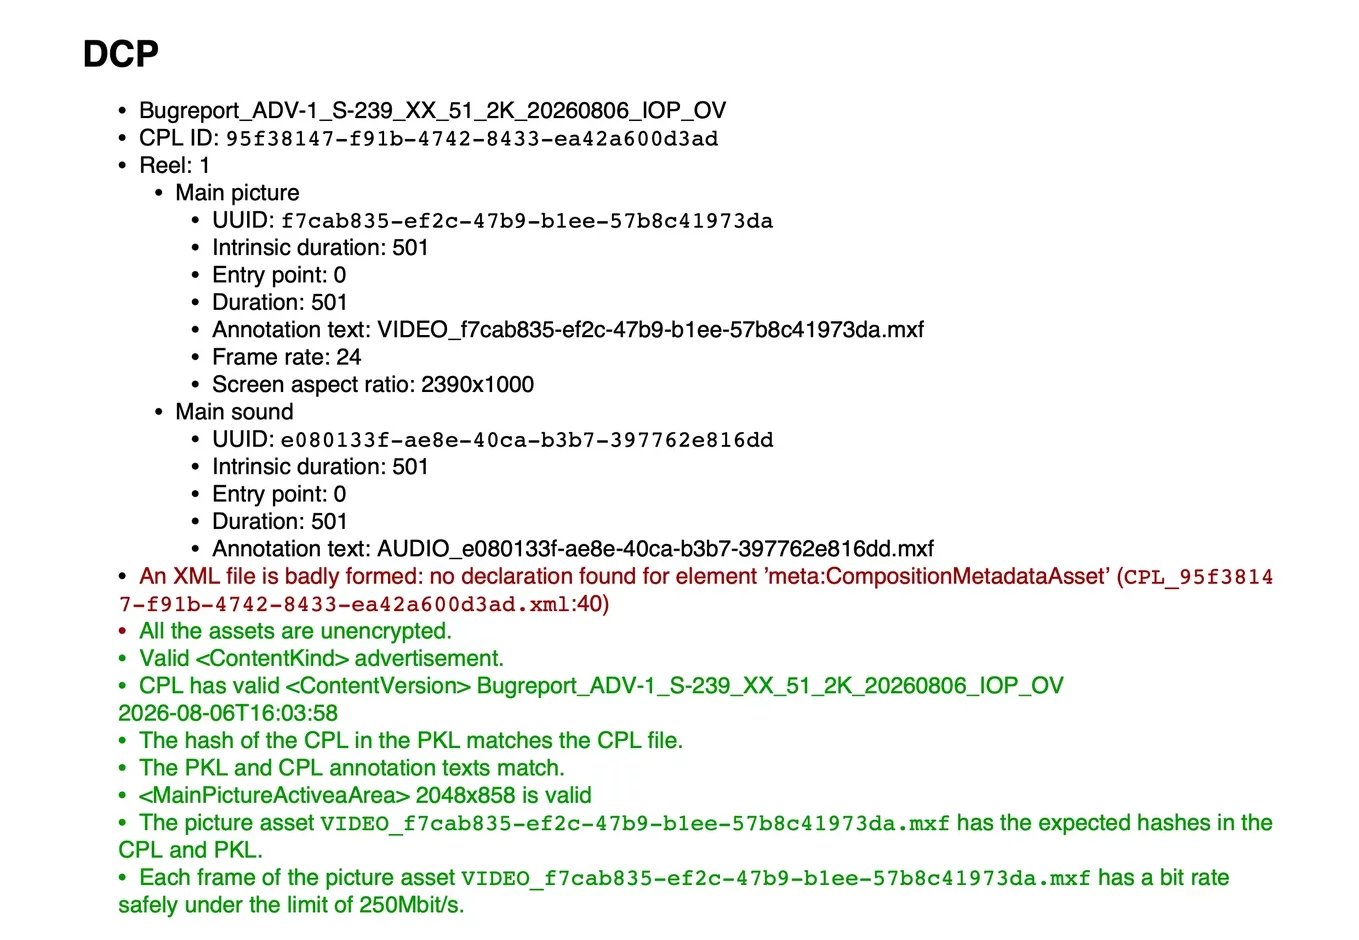
Important note: Resolve Studio v21 still writes incomplete SMPTE syntax, and verification will fail (the DCP will still play if the festival or cinema trusts it, though). Sadly there is also a bug with IOP exports in v21, also failing XML validation. Currently, if you must pass some sort of QC, use v20 or DCP-o-matic to repack (without re-rendering).
②
Metadata is missing or faulty. Either your input was wrong or the software messed up the syntax.
As explained, DCPs need a whole bunch of metadata; some of it, like language, audio or screen format, is created by user input—as are certain, madatory markers or keyframes for SMPTE.
Another big part is fulfilling the naming convention for the package title, which needs to be set correctly according to the ISDCF standard. This happens via a dedicated title tool and includes all important specs.
Check compliance: You can use the free DCP-o-matic Player or the demo version of EasyDCP Player to simulate playback and soft-check your DCP (both offer a verification/validation option).
Important note: Do not use Wraptor (incl. with Adobe) or OpenDCP (discontinued in 2020), because both produce faulty, broken Packages with a low chance of working.
③
You did not transfer the DCP to a Linux-formatted drive, used an SSD, or the upload was incomplete.
Only use fully USB 2.0-compatible HDDs under 500GB for best compatibility (slow) or, for internet delivery, a p2p cloud transfer service like wetransfer pro. Zip your DCP for cloud sync services, though.
Attention!
Bug in Resolve Studio 21 – use Version 20 instead
DCP export malfunctioning with version 21 & 21.1
interOP (IOP) syntax (XML metadata) does not validate when the package is inspected and QC'ed. This does not mean the DCP will not play in a cinema, this remains unaffected. If, however, a 3rd party like a festival or agency wants to verify your sent package, they most likely will not trust and reject it.
This has been happening ever since v21 of Resolve Studio came out, and you can fix it by just opening the exported package in DCP-o-matic and rewrapping it there without re-rendering it (using the correct settings, of course), as this will just replace and rewrite the metadata and XML syntax..
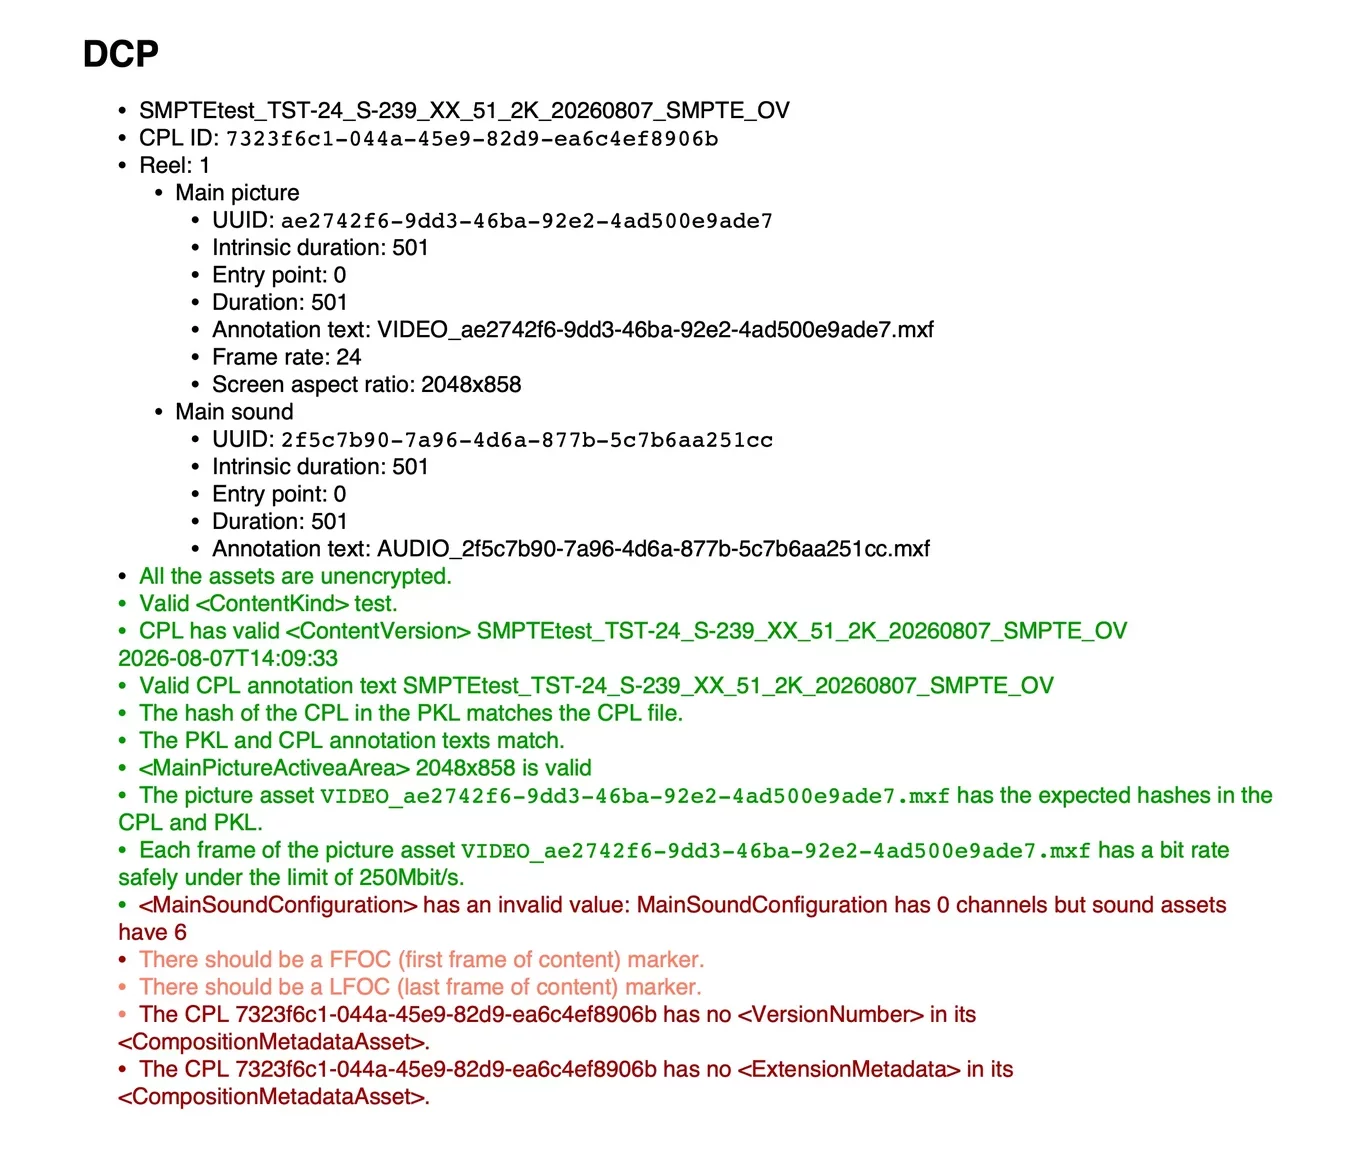
With IOP being the global safe standard, it's unfortunate that it has broken with v21, because, contrary to what you might think, you cannot just use SMPTE instead, even if this is the modern standard. The reason for this is also unfortunate: due to the ever-changing synax of SMPTE, Resolve Studio lacks settings to provide certain markers for SMPTE, so those DCPs also fail validation if inspected, see below:
For further help or inquiries, choose: